User onboarding often gets stuck in backlog limbo because it’s seen as a mammoth task—' too big,' 'too many teams involved,' or 'the devs are busy shipping shiny new features.' But it doesn’t have to be overwhelming. Focus on small, consistent improvements—test, tweak, and iterate. Onboarding is a process that evolves over time, not something you check off and forget.
Our user onboarding checklist outlines how to quickly get your onboarding flow from concept to launch within a few days. We also cover onboarding checklist examples and show you how to avoid the most common mistakes that haunt onboarding checklists.
A user onboarding checklist is a list of in-app tasks that help new users navigate and interact with your product successfully.
User onboarding checklists are a major part of your overall onboarding process. They help drive engagement, product adoption, and user retention.
The steps for completing a user onboarding checklist include:
Find the Aha! Moment
Map out the user journey
Identify and move friction points
Create targeted and contextual guidance
Build product flows that guide users seamlessly
Launch and analyze the checklist
Include feedback loops
Optimize for mobile
What is a user onboarding checklist?
A user onboarding checklist is a list of in-app tasks that new users complete, helping them better understand and use your product. The tasks outlined in user onboarding checklists are often simple, prompting users to explore your product’s core features and functionalities while not getting overwhelmed. Most importantly, users can always come back to checklists at any point of their onboarding journey to see their progress. They’re always available, and users don’t need to complete tasks linearly.
Keep in mind that user in-app, user onboarding checklists are different from in-app checklists, as the latter comes after the onboarding phase.
Whether it involves scheduling a post or sharing a file with team members, checklists aim to get users acquainted and nudge them towards their “Aha!” Moment, and drive feature adoption.
Why a user onboarding checklist is crucial for retention
Onboarding process checklists are an essential part of your onboarding strategy, helping you retain users long-term. Here’s how:
Leads to user success: An onboarding checklist segments complex tasks into smaller steps. This not only removes confusion but also lets users know exactly how to achieve their goals. By highlighting progress, you motivate users and lead them toward their first "aha moment" faster. For example, a CRM tool might guide users to import their contacts, create their first email template, and launch a test campaign—all essential steps to showcasing immediate product value.
Lowers drop-off rates: Drop-offs often happen when users hit unexpected friction or don’t understand their next step. A well-designed checklist adapts to user behavior, providing clear guidance to keep them on track. Pro tip: Pair your checklist with tooltips or progress nudges that appear when users pause or get stuck.
Helps identify friction points: A checklist is a diagnostic goldmine. By tracking where users hesitate, skip steps, or abandon the process, you can pinpoint areas of friction and refine your product experience. Integrate your checklist with analytics tools like Mixpanel or session replay software. For example, if users consistently drop off during a setup step, it might signal a need for simplification or clearer instructions.
Overall better onboarding:A stellar onboarding experience can improve retention rates by 50% , and a user onboarding checklist will definitely make that onboarding process much smoother. Design your checklist to adapt based on user persona, role, or product tier so it feels tailored to their journey.
Definition? Check. Benefits? Check. Let’s look at the different types of onboarding checklists you can introduce to your onboarding process.
Types of user onboarding checklists
There’s more than one type of user onboarding checklist to give your users. The right type for you varies depending on your onboarding strategy, product complexity, and overall goals. The main types of user onboarding checklists include:
Basic onboarding checklist: a basic onboarding checklist that introduces users to your product’s core functionalities
Feature-specific: a focused SaaS onboarding checklist that helps users understand and use a specific product feature. These checklists are especially helpful for new features.
Account-focused: these checklists layout tasks to help users complete actions related to their profile or account, such as adding billing information or configuring preferences
Network effect: Includes tasks that encourage users to interact with others and invite collaborators to drive engagement and growth
Sandbox-based: designed to let users explore a product’s core features in a safe (cost-free) environment, these onboarding checklists provide users with a fully functional, controlled version of the product, often pre-loaded with dummy data
For example, Heyflow has a basic onboarding checklist, prompting users to take one step at a time.
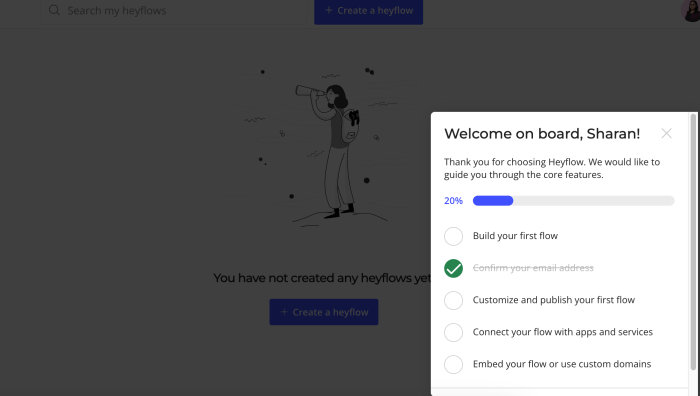
Hopefully, these types will help you figure out which checklist you need to create for your ICP. Let’s dive deeper into how you can create them.
8 Steps to create an impactful user onboarding checklist
When it comes to building impactful user onboarding checklists your users will love, there are eight steps to consider. Consider adding them to your own checklist as you read through.
1. Find the Aha! moment ✅
If we think about why people sign up for your product, it’s really to see how it can help solve their problem. They are looking to understand the value your product provides and whether it is something they are willing to pay for.
To help your users quickly find value in your product, its important to identify what's their "aha!" moment.
The "aha!" moment is the point where a user "internalizes the value your product provides". It's where they suddenly see the value and become convinced that your product will help them succeed. In return, they become, ready to hand over their credit card, give you their contact list, invite their friends, or invest in some other way to take that next step.
Do not worry if you don't know what your “aha!” moment is yet. The goal here is to have a strong hypothesis of what actions or sequence of events your most successful users have taken that drove them to their first glimmer of understanding, the first time they say “Oh! This is a cool product.”
If you are not sure what your “Aha!” moment is, start by talking to your customers.
For new customers, schedule a time where you can watch them use the product, either in person or through screen share. Watch how they first begin to navigate your product, how they use various features, or where they might get hung up.
For your older customers, ask them why they chose you over a competitor, what is the biggest benefit they derive from your product, what they love most about your product, and what they can’t live without.
If getting your customers on a call is not an option, you can try utilizing the techniques below to craft hypotheses on your "aha!" moment.
Your main value proposition or differentiator
Most-used feature
What fans get most excited about
What your competitors talk about
🔨 You can also send a survey to collect a variety of responses. We've used Typeform for gathering feedback about our value proposition. Some example questions that you can consider including:
How would you describe [your company]?
What is the primary benefit you derive from using [your company]?
What do you like most about [your company] over its competitors?
Once you have some ideas, you can try to validate your hypothesis through surveys, user tests, and with product data. Look at the difference in engagement between users that have reached your hypothetical "aha!" moment compared to those that have not. If users that reached your hypothetical "aha!" were much more engaged then you have a strong hypothesis. You may not be 100% certain in your "aha!" moments, but use the best estimate to test and refine over time.
❗️ NOTE: The "aha!" moments are specific to each user persona. If you have multiple personas (e.g. a team admin vs. a team member) then the points of value will be different!
2. Map out the user journey ✅
Once you have the goal(s), you need to understand the path to get there. This is necessary to understand where users might be getting stuck and where you need to interject/improve.
Set your "aha!" moment as the goal, and work backward to identify all the steps required from a user and from your product to get there. Be very specific here -- each click, wait, input, page load etc. should be detailed. This is important, because we will be evaluating friction at this level.
You're looking to create a flowchart of actions that end up in the user reaching "aha!"
Now do this for each point of value; it can actually go way beyond what you traditionally defined as 'user onboarding', to include new value that users seek throughout their lifecycle.
🔨 We’ve used MindMeister in the past to help us map out these flows. You could also use Google Drawings!
3. Identify the friction ✅
Once you have the path laid out, it's critical to assess where along this route users are leaving or getting stuck. This again is more research; great onboarding design requires you to know the problems intimately!
Construct an analytics funnel (within your analytics software) with the events of your path to identify where the majority of the drop-off is. Here is an example from our friends at Amplitude:
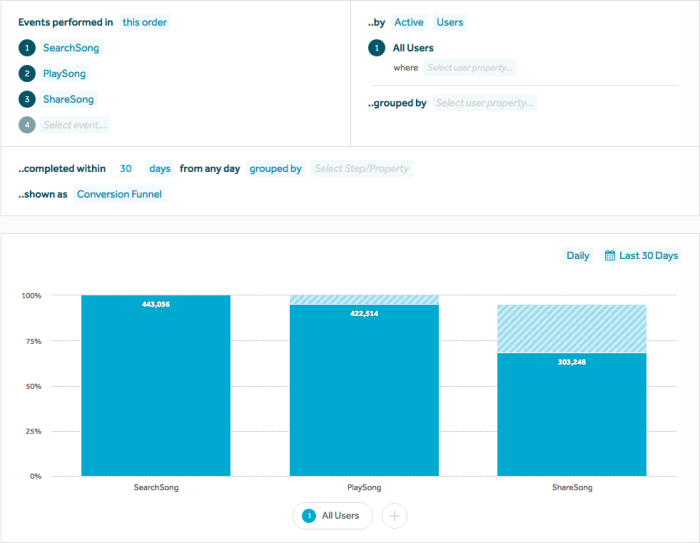
🔨 If you don't have all of these key events logged, then you could use a product such as Heap which doesn't require any engineering resources to track events, once it's been implemented (just like Chameleon!)
Once you know where to look, you need to understand why users are dropping off there. You can conduct user studies and research, and when users are near the drop-off point/s, ask questions such as:
What did you expect to see or do? / What are you looking for?
What is confusing here?
What do you need to take the next step?
🔨 You can also use FullStory to see exactly what users are doing in your product and where they are struggling. Using it we’ve uncovered some great insights on parts of our flow we thought were obvious but users were in great need of help.
4. Draft your guidance ✅
If you’ve ever tried to learn an instrument you might remember that the first song your music teacher taught you was something similar to Twinkle Twinkle Little Star or Happy Birthday. It was simple, might have taken only a few tries to play it perfectly from beginning to end.
Help users learn your product in a similar way; show them something simple and delightful that they can grasp quickly. If they succeed here, they get fueled with fulfillment and motivation to continue to the next chapter!
To draft the help and nudges you need to provide, we'll have to decide what content to show, when it’s delivered, who it’s delivered to and how it’s delivered (which channels).
Evaluate:
1. How can you increase a user's motivation?
2. How can you increase a user's ability?
3. What triggers are needed to prompt action?
Read more on our thesis towards driving user action, based on the BJ Fogg model.
Look back at where users are getting stuck or dropping off and identify how you can help them get to the next step.
If your users discovered the main features but not properly using them, teach them how to use it correctly. Add a quick tooltip when they first discover the feature.
If users drop off before they even get to complete the quick wins, they might not understand where to navigate next or how to get started. Try using a lightbox that shows them exactly where to go next.
If your product is more complex or may require some technical knowledge don’t be afraid to use some helpful videos that show users how to get started and get the most out of your product. (Try to keep these videos short, remember.. you’re trying to get them to quick wins, not through your entire product all at once.)
If some people have engaged with all your quick win features but they still end up churning, then consider starting a conversation with them to find out what they are looking for and why they signed up. You might discover that certain personas need a different onboarding and require a different “aha!” moment that they didn't see in your original onboarding flow
5. Build the product flows ✅
This is where the fun begins! At this point, you have done all the heavy lifting 😅 and don't even need any engineering help!
You have identified the framework for guidance (what, when, who, how) and now it’s time to build this and get some results!
There are many awesome tools that help you avoid depending on your engineers; you can use Intercom or Customer.io for emails, Heap or Mixpanel for analytics, oLark or Zendesk for live chat, Help Scout or Readme.io for documentation etc. Check out the full [stack of tools we use for our own user onboarding](/blog/user-onboarding-stack).
6. Launch and analyze ✅
The last step in the user onboarding checklist is launching your onboarding, but it's more than just hitting publish and letting it go.
User onboarding isn’t something that you can build once and then revisit in 6 months. It is something you are always testing and iterating on, and finding new ways to optimize your user activation rates. Even if you build this in-house and rely on your engineers, try to schedule time for revisions and improvements; the second iteration is always going to be better than the first.
Also, ensure you're collecting data (🤫 Chameleon does this automatically) so you can assess and evaluate performance and get the kudos when your activation rate skyrockets!
Chameleon has a tour analytics dashboard, allowing you to gain visibility into how your checklists are performing in one place. While the default list shows you all your tours, you can also filter individual examples and time ranges for a closer look.
Can’t decide between variants? Not to worry. Chameleon offers A/B testing for your onboarding experiences, helping you remove the guesswork while letting the data guide your decisions.
7. Include feedback loops
Though checklists are especially helpful for retaining users and driving them toward product adoption, they’re also an opportunity to gain consistent feedback from your users. You can then use this information to refine your entire onboarding process.
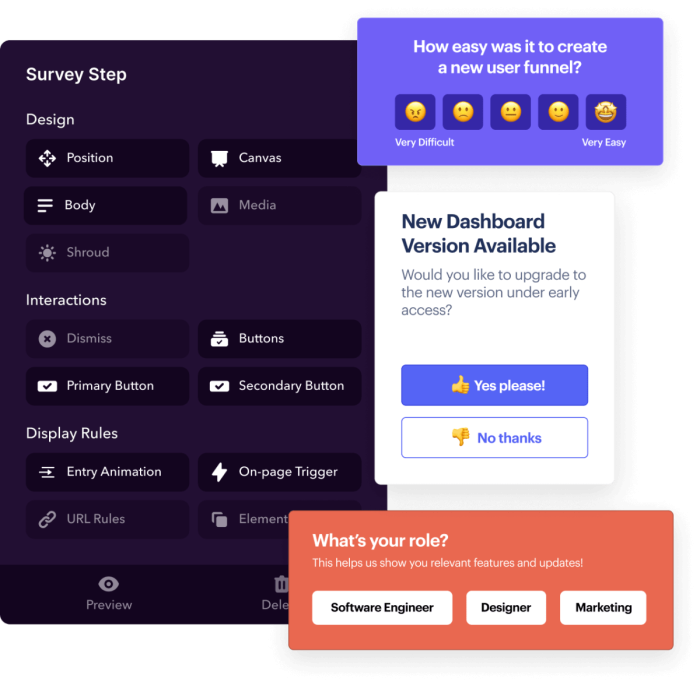
Adding feedback loops is important because user needs evolve—a feature that wasn’t important yesterday may make all the difference tomorrow. Pepper in microsurveys or NPS questions via email throughout critical phases in your onboarding process.
Ask questions like:
How easy was completing this step for you? (1 being very easy, and 5 being very difficult)
What could make this process easier for you?
Do you feel ready to use [specific feature]?
Collect user responses, analyze them for trends, and use your answers to eliminate friction points, update, and refine specific parts of your onboarding process.
A tool like Chameleon offers contextual and targeted in-product microsurveys so you can get contentious answers and fuel your feedback loop.
8. Optimize for mobile
78% Of people access the internet via mobile. This makes building a seamless and mobile-friendly onboarding experience all the more important.
To make your user onboarding checklists easy for your mobile users, consider:
Minimizing the number of steps.
Using large, tappable buttons while ensuring interactive elements are spaced properly.
Testing across different device screen sizes for responsive design and accessibility.
Taking advantage of mobile-specific features and gestures like push notifications and swiping.
Once your onboarding checklist (and the entire onboarding process) is optimized for mobile, you can rest assured users are finding value regardless of what device they’re using. However, there are still mistakes that you should be wary of when designing your user onboarding checklists. Let’s get into them.
Common mistakes in user onboarding checklists (and how to avoid them)
Knowing what not to do is just as important as knowing what you should do when building an onboarding checklist. It’s easy to go wrong, and if you do, you risk users becoming confused, disengaged, or downright frustrated.
Here are a few common mistakes you should avoid:
Overloading users with too much information: Keep it simple with the KISS principle. If users get too much information during onboarding, they will be overwhelmed and split before they realize how valuable your product is.
Not allowing users to revisit: Not all users will be ready to complete all your checklist steps at the start. Not allowing them to revisit robs them of a useful reference point where they can address missed or skipped steps, leading to confused and frustrated users.
Lack of personalization: Generic onboarding checklists won’t suit a diverse range of users. This leads to disengaged users.
Ignoring user feedback: Your users will often tell you what’s wrong with your product or onboarding checklists. By ignoring their feedback, you miss opportunities to alleviate user pain points.
Focusing on features instead of value: Your users don’t care about features as much as they care about the value they provide them. Highlighting features without explaining benefits will ring hollow for users who have jobs-to-be-done (AKA everyone!).
Not providing context for each step: Not giving users the information they need to complete steps can be confusing, ultimately moving users away from product adoption instead of towards it.
Not allowing users to skip steps: Not all users will need your onboarding checklist to understand your product’s value and use it effectively. If you don’t allow independent users to skip, your onboarding checklist becomes a barrier to value instead of facilitating it.
User onboarding checklist examples
One of the best ways to learn how to create stellar user onboarding checklists is by learning from the best. Here are three user onboarding examples from brands that utilize onboarding checklists to propel product adoption and increase retention.
1. Pipefy
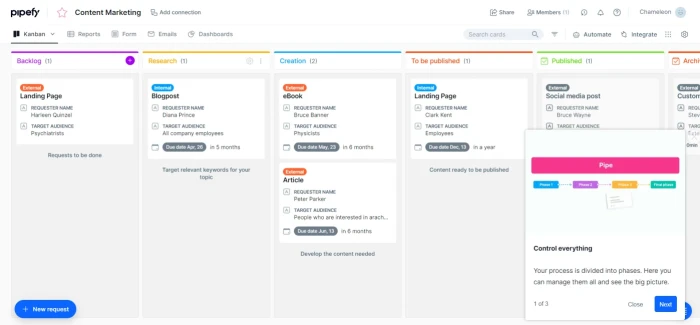
The business process automation software Pipefy used a one-size-fits-all horizontal onboarding process. However, as they diversified their verticals, their user base changed too. The solution? Introducing personalized checklists, or launchers, via Chameleon.
With these on-brand checklists, Pipefy was able to personalize onboarding to specific use cases, making the process more relevant to its different users. The result was a whopping Increase in average user retention from 7-12% to 20-30% in 6 days, only 8 days after they went live with Chameleon’s launchers.
2. Zendesk
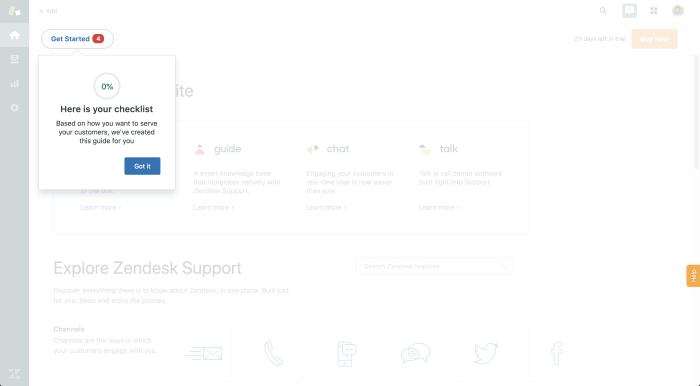
Zendesk is another SaaS solution that masterfully implements onboarding checklists to direct its users. Their personalized checklist serves as an overarching onboarding guide and even comes with a scale to inform users of their progress and press on toward their “Aha!” Moment.
3. Arcade
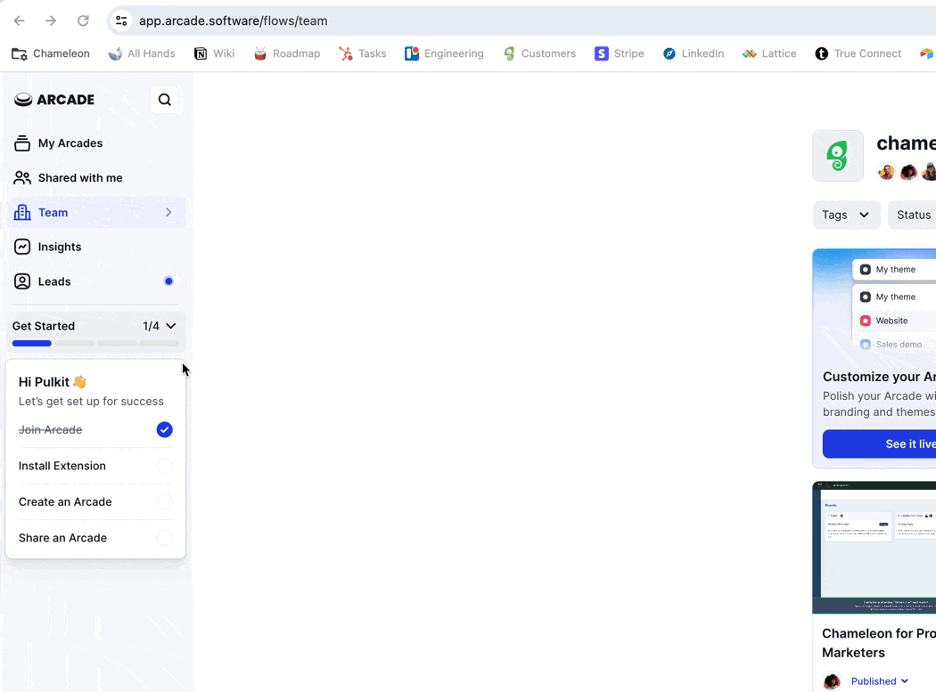
Arcade’s checklist is masterfully done because it isn’t just a to-do list. It makes using the product easy and fun with a combination of personalized touches and clear action steps. Complete with visual progress bars and indicators, it acts as a cheerleader, encouraging users to complete milestones and reducing their time to value.
Need more inspiration for your user onboarding?
Check out our library of user onboarding inspiration and find the onboarding UX perfect for your product.
Build an effective user onboarding checklist with Chameleon
This user onboarding checklist gave you the foundations of how to launch your user onboarding — something many product people find difficult.
Start, but don’t stop here. Keep looking for opportunities and improvement, keep researching first-time user behavior, and continue updating your onboarding checklist as technology and your users evolve.


